Step-by-Step Visual Guide: How to Sew Flawless Ruffle Handles With Lined Gussets

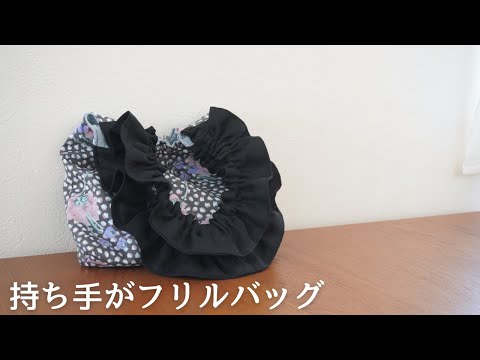
Textile crafters across Tokyo, Seoul, and global maker hubs have spent the past two years elevating basic canvas totes into romantic, high-utility statement accessories. At the center of this movement is the ruffle handle tote bag, a design that pairs playful volume with structural durability. According to recent production breakdowns from creators like ルシエルのハンドメイドレシピ, modern sewists are abandoning flimsy single-layer straps in favor of dense gathers, cloud-soft Korean nubi quilting, and clever seam concealing methods that bypass exterior bias binding entirely.
Sewing frills along load-bearing straps sounds deceptively simple, yet uneven gather distribution and bulk buildup at the bag rim ruin countless amateur builds. Building a lined tote with gusset support requires balancing delicate textile manipulation against mechanical load distribution. With the right sequence, anyone with a basic home sewing machine can produce crisp edges, balanced gathers, and showroom-ready interior seams.
📌 Key Takeaways:
- Ruffle Ratio: Achieving dramatic, uniform ruffles requires cut lengths 1.8 to 2 times the final strap length, stitched using dual gathering basting lines.
- Bulk Management: Modern nubi quilt bag tutorial methods skip external bias tape by enclosing raw strap ends directly between the outer shell and drop-in lining.
- Structural Integrity: Using firm interfacing for tote handles prevents structural collapse, ensuring decorative ruffles hold weight without cutting into the shoulder.
The Rise of Frilled Straps Across Maker Communities
Over the past four sewing seasons, functional minimalism has conceded ground to tactile, dimensional textures. The trend initially gained traction through Japanese pattern designers like 布もの作家 yasumin and boutique sewing channels such as ハンドメイド にここ, who introduced ruffled shoulder straps to soften everyday utility bags. What began as a delicate cottagecore accent has matured into an architectural design language.
The aesthetic expanded further when Korean nubi fabric, a densely quilted, cloud-soft cotton textile with 7mm to 14mm channels, entered mainstream DIY circulation. Nubi provides self-supporting body without requiring rigid canvas interfacings, making it the ideal base for a frilled strap sewing pattern. Independent crafters quickly recognized that pairing geometric quilt lines with organic, wavy frills turns scraps into premium bags that rival luxury boutique drops.
Core Measurements and Cutting Specifications
Precision cutting separates wobbly homemade bags from crisp artisan goods. For an everyday commuter bag capable of carrying a 13-inch laptop, a water bottle, and daily essentials, your handmade tote bag measurements should focus on generous base depth and proportioned drop lengths.
- Outer Body (Nubi or Heavy Linen): Cut two panels measuring 34 cm wide by 28 cm high.
- Lining Fabric (Cotton Broadcloth): Cut two panels measuring 34 cm wide by 28 cm high.
- Base Gusset Cutouts: Mark and remove 5 cm by 5 cm squares from both lower corners of each panel to produce a 10 cm finished gusset.
- Strap Cores: Cut two strips of medium-weight webbing or interfaced cotton measuring 4 cm wide by 42 cm long.
- Ruffle Strips: Cut two strips measuring 9 cm wide by 76 cm long (yielding an 1.8x gather ratio).
- Interior Pocket: Cut one rectangle measuring 18 cm wide by 24 cm high.
Applying medium-weight fusible interfacing for tote handles guarantees that your 4 cm wide core remains flat under load. Without this reinforcement, pulling forces warp the strap inward, compressing the ruffles into a chaotic knot whenever you carry weight.
Mastering the Gathering Stitch Technique on Bag Straps
Uniform ruffles require mechanical control, not freehand guesswork. The most common error is relying on a single basting stitch, which often snaps mid-pull and produces erratic bunching.
To execute the dual gathering stitch technique:
- Fold the 9 cm wide ruffle strip lengthwise, wrong sides together, and press it flat with a steam iron to establish a clean outer edge.
- Set your sewing machine to its maximum stitch length (4.0 mm to 5.0 mm) and slightly loosen the needle tension.
- Stitch the first gathering line 0.5 cm away from the raw long edge, leaving 10 cm thread tails on both ends.
- Run a second, parallel basting line 0.8 cm from the raw edge.
- Anchor the bobbin threads on one end by wrapping them in a figure-eight around a straight pin. Gently pull both bobbin threads from the opposing side, working the ripples toward the center until the ruffle strip shrinks to exactly match the 42 cm strap core.
Distribute the ruffles so the center 30 cm contains the richest volume, tapering slightly toward the final 6 cm at each end. This taper prevents excessive fabric buildup where the handles join the bag's main rim seam allowance.
| Ruffle Construction Style | Gather Multiplier | Best Fabric Match | Structural Durability |
|---|---|---|---|
| Self-Fabric Double Fold | 1.8x, 2.0x | Quilted Nubi, Washed Cotton | High; washable, resilient edge |
| Satin Ribbon Gathers | 2.2x, 2.5x | Synthetic Leather, Velvet Base | Moderate; prone to snagging |
| Raw Edge Bias Strips | 1.5x, 1.7x | Washed Linen, Raw Denim | Low-Medium; deliberate fray finish |
Baste the gathered ruffle strip along the outer edge of your interfaced strap core with a regular 2.5 mm stitch, sewing directly between the two gathering basting threads. Once stitched, pick out the original basting threads with a seam ripper to leave a clean, flat working component.
Inner Pocket Construction and Clean Bias-Free Assembly
A functional tote demands internal organization. To complete the inner pocket construction, fold your 18 cm by 24 cm pocket piece right sides together to create an 18 cm by 12 cm rectangle. Stitch around the three raw sides with a 1 cm seam allowance, leaving a 4 cm turning opening along the bottom edge. Clip the corners, turn the pocket right side out, push the points sharp, and press with high steam.
Position the pocket on the right side of one lining panel, centered horizontally and 7 cm below the top edge. Topstitch the sides and bottom edge 2 mm from the fold, backstitching firmly at the pocket mouth to absorb daily stress.
Many vintage patterns rely on visible edge binding, but contemporary makers favor a bias tape alternative: the clean drop-in envelope finish popularized by studios like KOTOBUKIsewing and # あおいDIY aoi DIY. This method completely encloses raw seam edges inside the lining.
To prep the body:
- Place the two outer panels right sides together. Stitch the side seams and bottom edge with a 1 cm seam allowance, leaving the corner cutouts open.
- Repeat for the lining panels, but leave an 8 cm turning gap in the center of the lining floor.
- Open the square corner cutouts, line up the side seam with the bottom seam, pin flat, and stitch straight across to create boxed gussets.
Joining the Straps and Sealing the Rim
Aligning the ruffles at the rim determines whether the tote rests smoothly against your hip. Pin each completed handle to the right side of the exterior bag body, positioning the strap ends 7 cm inward from the side seams. Ensure the ruffled flange faces inward toward the bag center so it will not get caught in the side seam allowances. Baste the strap ends securely 0.5 cm from the top edge.
Slide the exterior bag (right side out) inside the lining bag (wrong side out), so the right sides of the outer fabric and lining touch. Tuck the ruffled straps completely down into the interior space between the two layers.
Pin the top rim meticulously, aligning the side seams. Stitch all the way around the rim perimeter using a strict 1 cm seam allowance neat finish. Backstitch directly over the four strap anchor points to lock the handle anchors against heavy grocery loads.
Pull the entire outer shell and straps through the 8 cm gap in the lining floor. Tuck the raw edges of the lining gap inward by 1 cm and stitch it shut with an edge stitch or invisible ladder stitch. Push the lining down inside the outer bag, press the top rim flat with a tailored press cloth, and complete a final perimeter topstitch 0.5 cm from the top edge. This final stitch secures the rim and prevents the lining from rolling upward.
Frequently Asked Questions (FAQ)
Q1: Why do my ruffle handles twist awkwardly when the tote bag is full?
A1: Twisting occurs when the core strap lacks interfacing or when ruffles are cut off-grain. Always use medium-weight non-stretch interfacing on your core webbing and cut ruffle strips along the straight grain to prevent diagonal torque.
Q2: Can I substitute satin ribbon for handmade fabric gathers?
A2: Yes. Using pre-edged satin ribbon removes the need to press folded fabric, speeding up construction significantly. However, because polyester satin ribbons slip during sewing, pin them at 2 cm intervals and use a walking foot to prevent feed-dog shifting.
Q3: How do I sew through dense nubi seams without dropping stitches?
A3: Quilted nubi layers become bulky where the straps meet the rim. Switch to a size 90/14 or 100/16 jeans/denim needle, increase your stitch length to 3.0 mm, and tap the balance wheel manually across the thickest seam intersections.
Precision Crafting for Daily Use
The enduring popularity of frilled tote bags proves that structural utility and expressive detailing can live together comfortably in modern sewing. By replacing thin ribbons with stabilized fabric cores, tuning gather ratios to match textile drape, and burying raw edges beneath clean drop-in linings, makers transform light novelties into sturdy, everyday carries. Precision basting and measured seam allowances remain the bedrock of professional bagmaking, turning simple cotton cuts into heirloom pieces that wear well for years.