Suzuki Key Fob Teardown: How to Replace the Battery at Home Without Scratches or Damage
You tap the door handle button on your Suzuki, and nothing happens. Inside the gauge cluster, a tiny amber key symbol flashes, or a dash alert spells it out: key battery low warning indicator. Modern smart keys chew through power quickly, usually dying within two to four years because their low-frequency radio systems communicate constantly with the vehicle. Dealerships routinely charge between $35 and $65 for a five-minute swap, but you can do it at your kitchen table for under $3 if you know how to pop the casing without chewing up the soft plastic edges.
Automakers design these remotes with tight snap-fit seams to keep out rain and pocket lint. Forcing them open with the wrong tool tears the alignment tabs, snaps internal clips, or ruins the silicone weather seal. While Suzuki has made massive long-term bets on vehicle power, demonstrated by its landmark acquisition of Kanadevia’s solid-state battery business on March 4, 2026, as detailed in an ITmedia Report, the micro-power running your day-to-day key fob relies on simple, standardized coin cells that you can swap out in minutes.
📌 Key Takeaways:
- The Right Cell: Modern Suzuki smart entry fobs use a CR2032 coin battery, while older integrated-blade flip fobs rely on a smaller CR1620 key battery.
- Damage Prevention: Wrapping a flathead screwdriver in electrician’s tape prevents gouging the soft plastic prying notch inside the key housing.
- Dead Fob Bypass: If your battery dies completely, holding the physical Suzuki emblem directly against the engine start button bypasses the transponder check to fire up the car.
Why Suzuki Remotes Fail and How to Catch the Warnings Early
Car keys used to be inert slabs of steel. Today, a Suzuki Vitara smart key or a Suzuki Jimny keyless entry fob is a continuous radio transceiver. The fob listens for ping signals from exterior vehicle antennas operating at 125 kHz, answering back on 315 MHz or 433 MHz bands. That continuous ambient listening drains current even when the car sits parked overnight in your garage.
Before the transmitter gives out completely, your vehicle warns you. The operating range drops noticeably; where you once unlocked the hatch from 30 feet away, you suddenly need to stand right beside the driver door. In vehicles equipped with a digital instrument cluster, a green or amber dashboard icon shaped like a key with an exclamation point will illuminate immediately after engine shutdown. Take that cue seriously. Ignoring the visual alert leaves you relying on the mechanical emergency key to unlock the door, which frequently trips the perimeter anti-theft alarm until the vehicle validates the transponder.
CR2032 vs. CR1620: Choosing the Exact Coin Cell for Your Suzuki Model
Popping the casing before checking your owner's manual often results in buying the wrong replacement cell. Suzuki uses two distinct form factors depending on whether your car features keyless push-button start or an older turn-key ignition switch.
A round-cornered rectangular Suzuki Smart Key shell houses a 3-volt lithium CR2032 coin battery. The alphanumeric code indicates physical dimensions: 20 mm in diameter and 3.2 mm in thickness. Thinner variants like the CR2025 might appear identical to the naked eye, but they sit loose against the contact prongs, causing intermittent disconnections when you hit road bumps. Conversely, traditional Suzuki Swift remote key units with a built-in metal key blade typically run on a CR1620 key battery, which measures 16 mm across and 2.0 mm deep.
| Suzuki Vehicle & Key Type | Battery Specification | Nominal Life Span | Opening Tool Profile |
|---|---|---|---|
| Swift / Swift Sport (2017, 2026 Smart Fob) | CR2032 (3V Lithium) | 2, 3 Years | Taped Precision Flathead (3, 4mm) |
| Jimny / Jimny Sierra (JB64 / JB74 Push-Start) | CR2032 (3V Lithium) | 2, 4 Years | Mechanical Key Tip or Plastic Pry Tool |
| Vitara / Escudo / S-Cross (Keyless System) | CR2032 (3V Lithium) | 2, 3 Years | Taped Precision Flathead (3, 4mm) |
| Older Swift / SX4 / Alto (Integrated Blade Key) | CR1620 (3V Lithium) | 3, 5 Years | PH00 Crosshead & Plastic Wedge |
Opening the Smart Fob Casing Without Gouges or Scratches
Most DIY battery replacements go wrong within the first ten seconds. Impatient drivers shove an unshielded steel blade into the external parting line, gouging the soft ABS plastic. Suzuki planned for maintenance by hiding the opening slot out of sight.
Locate the small slide release switch on the rear shell of the fob. Slide it across with your thumb to eject the mechanical emergency key. Look directly inside the cavity left behind by the blade. You will see a small molded separation ledge, a dedicated flathead screwdriver prying slot, sitting inside the central seam.
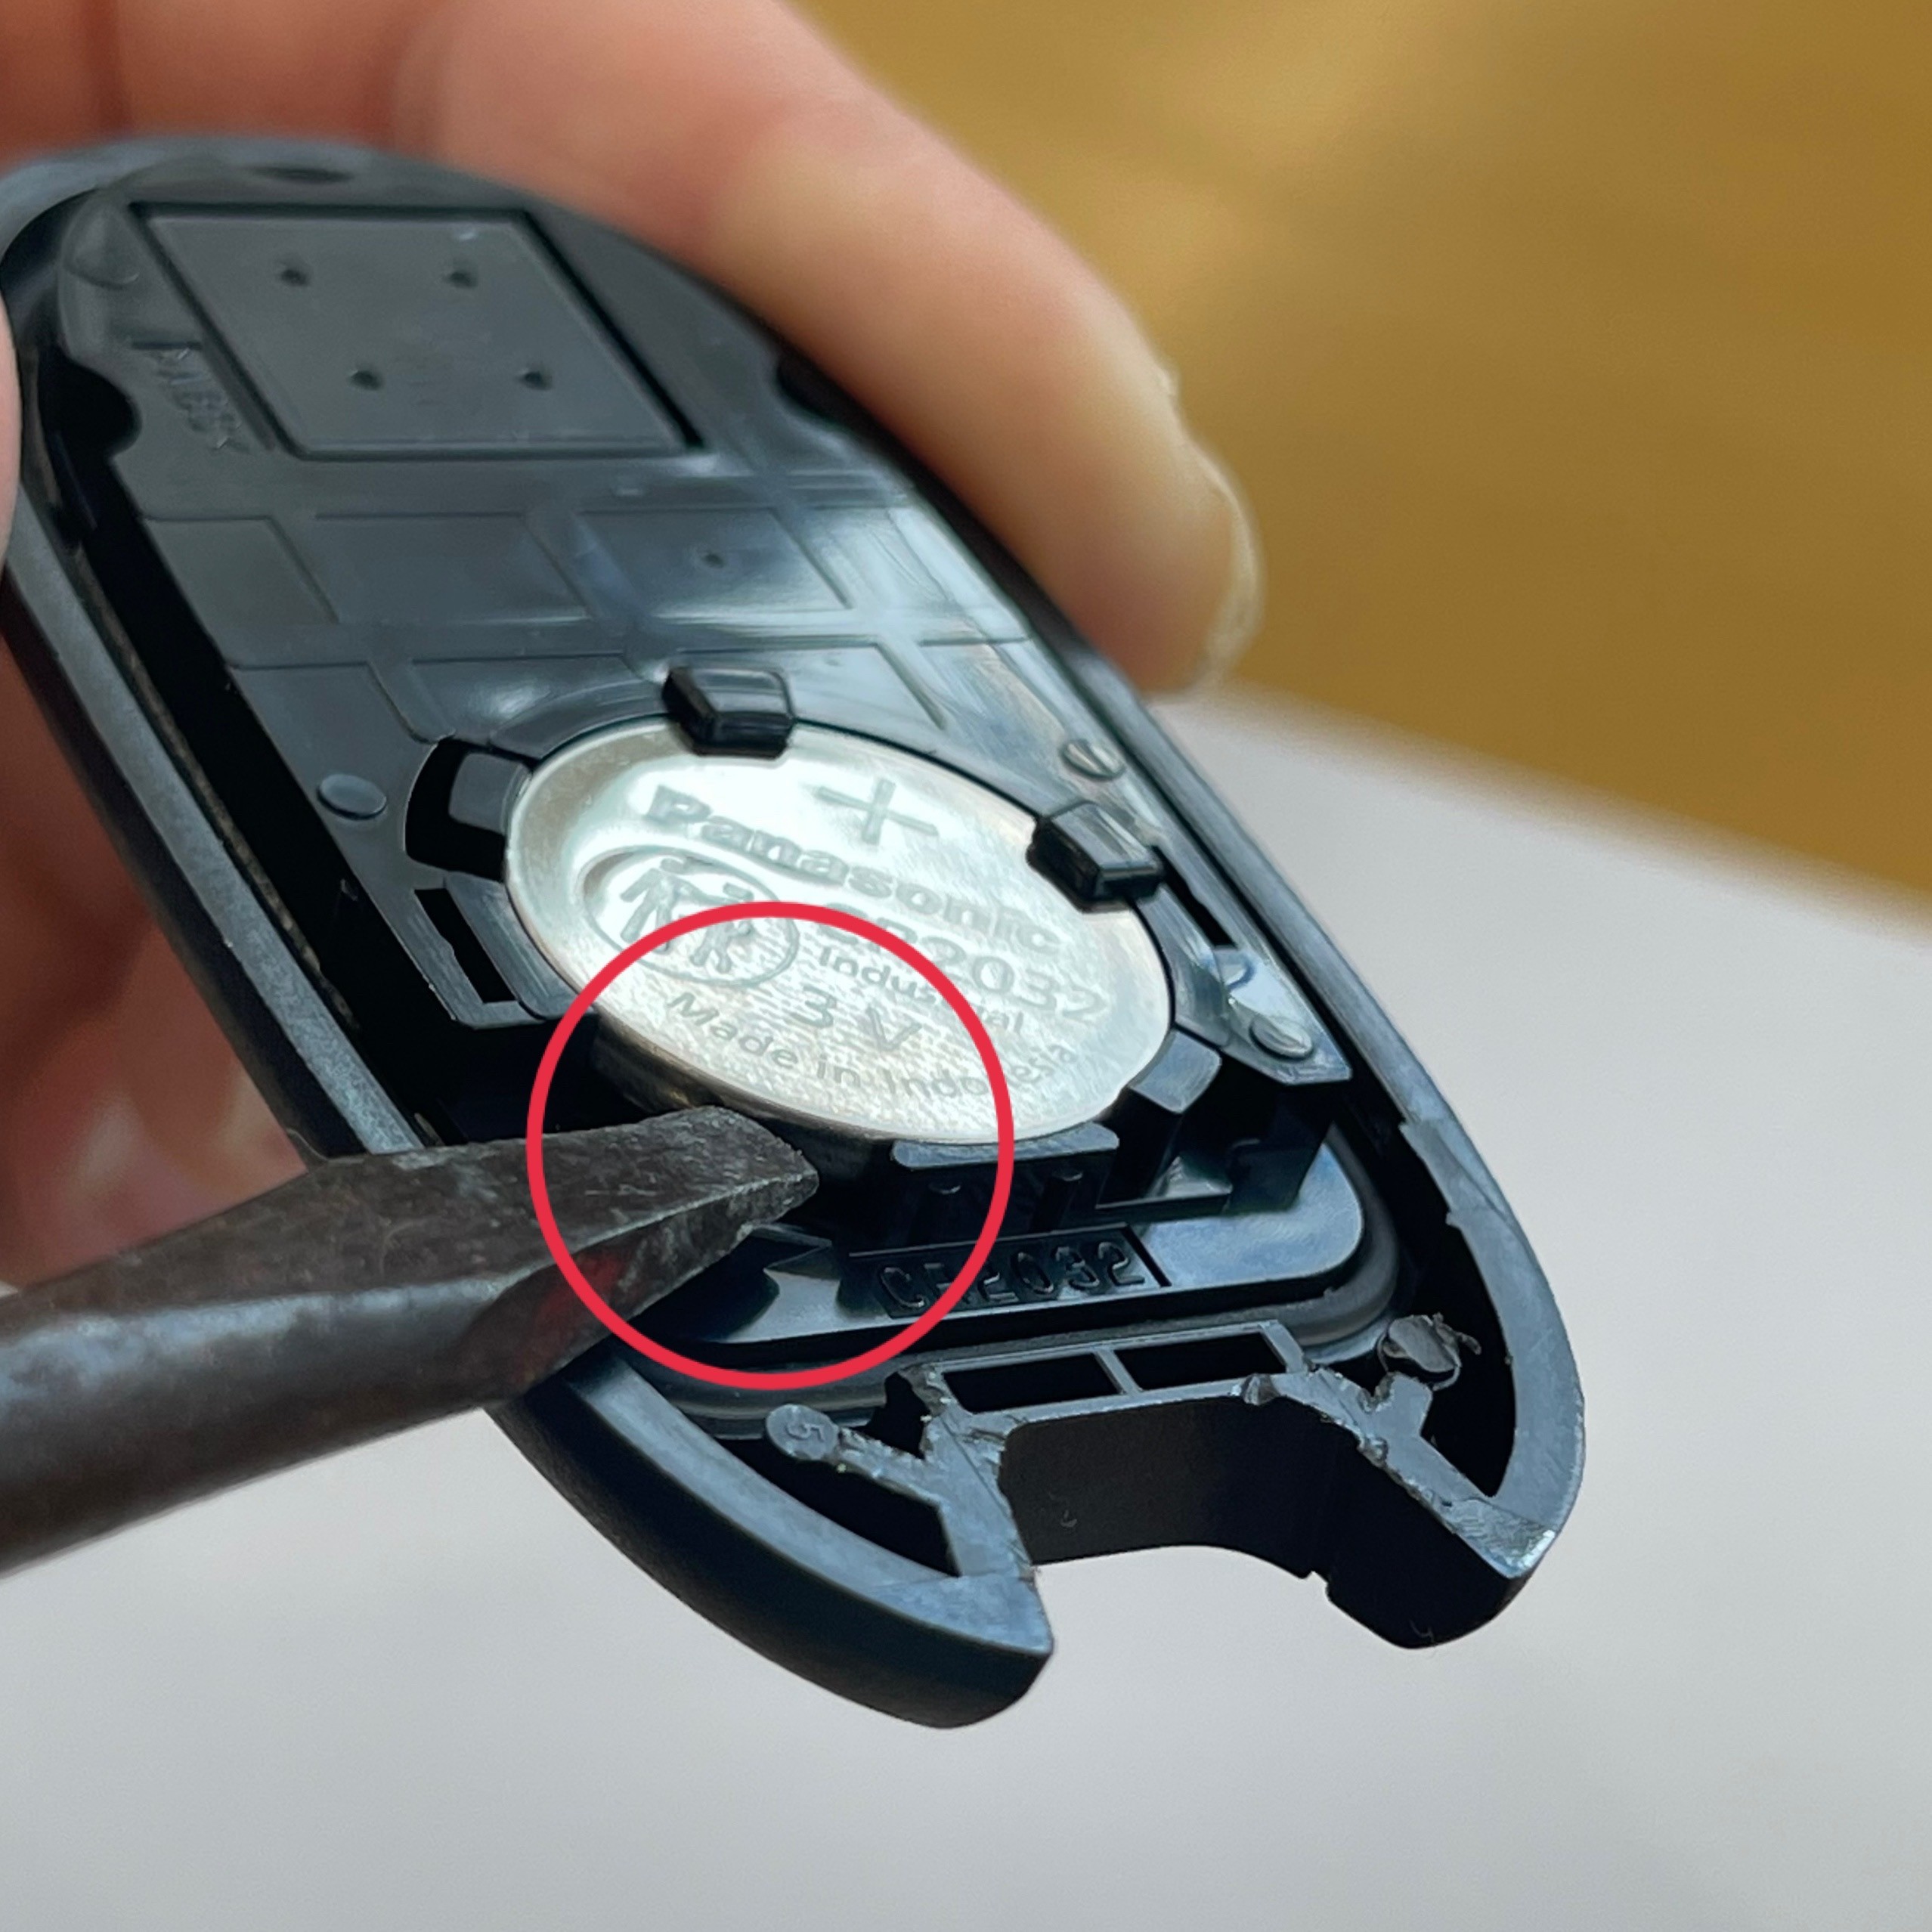
Wrap the tip of a 3mm or 4mm flathead screwdriver in a single layer of electrical tape or heavy masking tape. Insert the cushioned tip into that internal slot. Do not pry outward; instead, give the tool a gentle 90-degree axial twist. You will hear a firm pop as the perimeter retention snaps release. Run a guitar pick or plastic spudger along the seam toward the keyring eyelet to separate the two clamshell halves completely.
Internal Component Teardown: Water Seals and Transponder Chips
Inside the opened casing, you will see a green printed circuit board seated beneath a flexible rubber gasket. This perimeter element is the circuit board waterproof seal, which shields the microchips from rain and sweat. Inspect this gasket carefully. If it pulls free from its molded groove during disassembly, seat it back into position with clean tweezers before proceeding.
Embedded near the forward nose of the plastic shell sits the immobilizer transponder chip. This passive ferrite component communicates with the immobilizer coil around the steering column. Never touch this chip with metal tools or use excessive force near it. If you crack the ferrite body, your vehicle will refuse to start even after installing a fresh battery.
To pull the old cell, slide a non-conductive plastic pry tool or a wooden toothpick under the edge of the battery to lift it out of its retaining clip. Avoid metal screwdrivers here; bridging the positive top shell to the negative base terminal short-circuits the new battery, instantly degrading its output voltage from 3.3V down to 2.8V. Insert the new cell with the positive pole marked with a plus (+) sign facing upward toward you. Wipe the surface with a lint-free cloth to remove fingertip oils, which can cause contact resistance over time.
Push-to-Start Emergency Ignition When Your Remote Battery Is Completely Dead
If your battery dies completely before you can replace it, you will not be stranded. Automotive safety regulations require a passive backup path for push-to-start vehicles.
Slide out the mechanical emergency key to manually unlock the driver door lock cylinder. If the car alarm sounds, step inside immediately and close the door. Depress the brake pedal firmly (or the clutch pedal on manual transmissions). Pick up the dead smart key and hold the back of the case, specifically the raised chrome Suzuki "S" emblem, directly flat against the engine start-stop button.
The vehicle’s push-to-start emergency ignition uses near-field magnetic induction. The start button pulses an electromagnetic field that energizes the transponder chip inside the key fob, confirming the vehicle’s security handshake without drawing any power from the dead coin battery. The dashboard key indicator will shift to green, allowing you to press the engine start button normally and drive away.
Frequently Asked Questions (FAQ)
Q1: Will replacing the key battery erase the remote's pairing memory?
A1: No. The transmitter pairing codes and immobilizer rolling codes are stored in non-volatile EEPROM memory on the fob's circuit board. The key can sit completely without power for months without losing its programming.
Q2: Why is my new battery draining in only a few months?
A2: This usually happens when the fob is stored within 15 feet of the vehicle at home, causing continuous wireless polling. Additionally, low-cost off-brand batteries often have high self-discharge rates; sticking to industrial-grade cells from Panasonic, Sony, or Maxell resolves this issue.
Q3: Can I clean an oxidized battery terminal inside the shell?
A3: Yes. Moisten a cotton swab with 90% or higher isopropyl alcohol and lightly buff the gold- or nickel-plated contact prongs. Allow the alcohol to evaporate completely for two minutes before seating the fresh coin cell.
Best Practices for Key Fob Maintenance in 2026
Taking care of modern automotive remotes comes down to simple preventative maintenance. Treat your key fob like the sensitive electronic computer it is. Avoid keeping spare keys in damp entryways or directly next to smartphones, where inductive charging pads and heavy wireless activity can trigger unnecessary battery drain. Keeping a sealed two-pack of CR2032 cells inside your glove compartment guarantees you will never be caught off guard by an unexpected cold snap or an unheralded dash warning.


