Chikuzenni vs. Nishime: Traditional Root Vegetable Rules You Can Safely Skip

Every December, home cooks across Japan brace for an avalanche of seasonal vegetable prep. Peeling fibrous burdock, hand-carving decorative carrot flowers, and parboiling tubers individually can consume an entire afternoon ahead of New Year celebrations. Yet modern culinary laboratories and viral home-kitchen innovations have dismantled these rigid dogmas. As culinary analysis from the MSN Report on seasonal root vegetables highlights, understanding how textures like lotus root renkon respond to heat matters far more than obsessing over antiquated cutting rituals.
💡 Quick Summary:
- The Essential Difference: Chikuzenni demands an initial high-heat oil sear with chicken, whereas traditional Nishime gently simmers raw root vegetables together without frying.
- Kitchen Shortcuts That Work: You can skip vinegar baths for burdock, bypass pre-boiling modern konnyaku, and streamline seasonings using a concentrated dashi-soy sauce base.
- Modern Appliance Shift: One-pan skillet braising and rice cooker methods cut active prep from 90 minutes down to under 25 minutes with zero flavor loss.
Kyushu Roots and the Oil-Searing Divide
To grasp why these two classic braised dishes cause culinary confusion, look to northern Kyushu. Chikuzenni originated in Chikuzen Province, modern-day Fukuoka Prefecture, where locals originally called it gameni. Folk etymology suggests the name stems from gamekumu, a regional term meaning to gather and toss together whatever wild game, fowl, and roots were on hand.
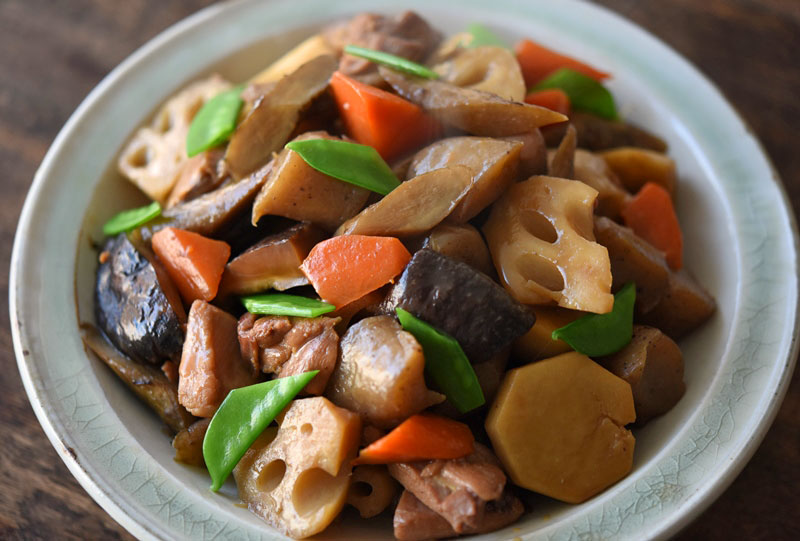
Nishime, by contrast, evolved through Kyoto’s refined temple cuisine and urban Edo home cooking. Classical Nishime contains minimal fat. Cooks gently simmer carrots, shiitake mushrooms, taro, and bamboo shoots in a seasoned dashi broth, aiming for a delicate, clear presentation where each vegetable retains its distinct hue. Chikuzenni breaks these rules entirely. The cook browns chicken thigh pieces in sesame oil first, tossing the dense vegetables directly into the rendered chicken fat before pouring in any liquid. That initial sear triggers a Maillard reaction, sealing the surface of the root vegetables and infusing the entire pot with a rich, glossy glaze.
Which Rituals to Keep and Which to Scrap
Traditional washoku manuals prescribe tedious prep steps that modern processing has rendered obsolete. Generations of home cooks were taught that gobo burdock root must soak in acidulated water for 15, 20 minutes to remove harsh tannins. Food scientists have debunked this: prolonged soaking leaches away chlorogenic acid, the exact polyphenol responsible for burdock’s earthy aroma. A brisk rinse under running water while rubbing the skin off with a crumpled ball of aluminum foil is all that burdock requires.
Konnyaku faces similar liberation. Historical konnyaku cake relied on crude calcium hydroxide coagulants, requiring rigorous salt-scrubbing and rolling parboils to eliminate bitter alkaline odors. Virtually all commercial konnyaku sold today uses food-grade calcium hydroxide in minimal doses; a 30-second hot water rinse straight from the kettle removes surface brine completely. Tearing the cake with your fingers or a spoon rather than cutting it with a knife remains the lone traditional rule worth preserving, as jagged edges absorb braising liquid three times faster than smooth sliced surfaces.
The treatment of renkon (lotus root) determines the final mouthfeel of the stew. Cutting renkon into irregular rolling wedges (rangiri) creates thick pockets that turn meltingly starchy during braising, while thin cross-sections retain a crisp snap. Home cooks can manipulate this texture purely through cutting angles rather than complex soaking treatments.
| Preparation Step | Classical Nishime Rule | Modern Chikuzenni Shortcut | Time Saved |
|---|---|---|---|
| Burdock Prep | Scrape peel bare; soak 20 min in vinegar bath | Foil-scrub skin lightly; rinse briefly in tap water | 15, 18 minutes |
| Konnyaku Purge | Rub with coarse salt; boil in saucepan for 5 min | Hand-tear into rough chunks; pour boiled water over | 8, 10 minutes |
| Broth Base | Steep dried kombu and bonito flakes separately | Shiitake soaking water + concentrated mentsuyu | 20, 25 minutes |
| Vegetable Shaping | Carve decorative blossoms (hanagiri, bevel edges) | Quick rolling wedges (rangiri) for surface area | 20, 30 minutes |
Modern Braising: Skillet Searing and Rice Cooker Automation
Culinary creators have radically shifted how home cooks approach Japanese meal prep tsukurioki. In late December 2022, culinary specialist Yukari demonstrated on Yahoo! Japan that an ordinary wide nonstick skillet produces superior caramelization compared to a deep stockpot. Searing 300 grams of chicken thighs skin-side down in a wide skillet renders the poultry fat quickly, coating carrots, bamboo shoots, and renkon in minutes. Simmering uncovered in the same pan accelerates liquid reduction, cutting total stovetop time to roughly 20 minutes.
Automation pushed the boundary further in December 2024, when prominent Japanese recipe developer Ryuji showcased a zero-effort rice cooker braising method. By tossing seasoned raw chicken, pre-cut root vegetables, rehydrated shiitake, and a standard ratio of soy sauce, mirin, and sake straight into an induction rice cooker, the appliance handles heat distribution autonomously. The steam pressure softens tough burdock fibers while preventing the chicken from turning stringy.
For flavor balancing, concentrated noodle soup base, mentsuyu, serves as an efficient seasoning engine. A standard 3x concentrated mentsuyu already combines premium soy sauce, mirin, bonito extract, and kombu dashi. Replacing individual measurements with 75 ml of mentsuyu diluted with dried shiitake mushroom rehydration liquid yields the exact sweet-savory depth expected of festive New Year osechi ryori without measuring four separate condiments.
Repurposing Leftovers Into Izakaya Classics
Because Chikuzenni yields hearty batches designed to sit safely at room temperature for winter festivities, handling surplus stew is a perennial challenge. Reheating the same braise three days in a row dulls the palate. The solution lies in creative kitchen transformation.
A widely praised household method turns cold Chikuzenni into savory croquettes. Strain 200, 250 grams of chilled braise, discard excess liquid, and pulse the vegetables and chicken in a food processor until finely minced. Fold this seasoned mixture directly into hot, roughly mashed russet potatoes. Because the root vegetables and chicken already carry deep soy-mirin seasoning, the filling requires no added salt or beef mince. Shape the mixture into patties, dust with flour, dip in beaten egg, coat in panko, and fry at 180°C (356°F) for three minutes. The resulting croquette delivers crisp exterior crunch against an intensely savory, sweet-potato-style interior.
Other zero-waste adaptations include chopping the braised mix into morning omelet fillings, or simmering it briefly with dashi and beaten eggs over a bowl of steamed rice as an ad-hoc oyakodon.
Who Benefits Most and When to Stay Classical
Adopting high-speed Chikuzenni methods requires matching the technique to the dining occasion. Skillet and rice cooker shortcuts fit busy weeknights and everyday batch cooking. Busy parents and urban professionals juggling work schedules can complete five days of nutritious bento lunches in under half an hour. The dish improves after resting overnight in the refrigerator as osmotic pressure pulls the seasoned broth deep into dense carrots and taro.
However, skip the shortcut route if you are constructing an heirloom tier for a traditional three-tiered New Year jubako box intended for formal guests. Formal osechi values visual separation: snow-white lotus slices, radiant red carrot wheels carved like plum blossoms, and pale dashi broths that leave each ingredient's individual color intact. In that specific setting, classical Nishime simmered in dedicated individual pots remains irreplaceable.
Frequently Asked Questions (FAQ)
Q1: Can I make authentic Chikuzenni without dried shiitake mushrooms?
A1: While fresh shiitake works in an emergency, rehydrated dried shiitake is structural to the flavor profile. The soaking liquid contains concentrated guanylic acid, an organic nucleotide that multiplies the umami of chicken and soy sauce. If using fresh mushrooms, replace the water with dashi stock powder or a dash of fish sauce to recover that lost savoriness.
Q2: Why does my chicken become tough and dry during braising?
A2: Always use bone-in or skin-on chicken thigh rather than chicken breast. Chicken breast loses moisture rapidly once internal temperatures cross 65°C (150°F). Thigh meat contains higher connective tissue that melts into rich gelatin over medium-low heat, keeping the protein tender across multiple reheats.
Q3: How long can braised Chikuzenni keep safely in the refrigerator?
A3: Stored in an airtight glass or ceramic container, Chikuzenni remains fresh for 4 to 5 days at or below 4°C (40°F). If preparing for Japanese meal prep tsukurioki, bring the stew to a gentle simmer for 2 minutes every other day if you plan to extend storage across a full week.
The Evolution of Modern Homestyle Braising
Japanese home cooking has never been static. What purists defend as ancient dogma often reflects nothing more than mid-twentieth-century kitchen workarounds designed for primitive coal stoves and untreated ingredients. Embracing concentrated dashi bases, nonstick skillet reduction, and hands-off appliance braising does not diminish the culinary lineage of Kyushu’s classic braise. By stripping away redundant acid baths and excessive knife work, home cooks reclaim hours of prep time while delivering the comforting, umami-dense stew that defines everyday washoku.