Daka Tuss Shrine Guide: The Simple Magnesis Trick Most Players Completely Miss

Traversing the submerged walkways of the Lanayru Wetlands remains one of the earliest navigational hurdles in Breath of the Wild. Tucked within the flooded remnants of Goponga Village, the Daka Tuss Shrine, subtitled the "Sunken Scoop" trial, routinely stalls new adventurers on their push toward Zora's Domain. The challenge strips away combat entirely, tasking players instead with fluid physics, magnetic manipulation, and deliberate spatial awareness.
Most players lose precious minutes wrestling with erratic orb trajectories or struggling against buoyant water resistance. What presents itself as an exercise in tedious ball-scooping actually hinges on a straightforward exploit of the game's physics engine. Understanding how the metal strainer interacts with Hyrule's fluid dynamics transforms a frustrating trial into an encounter you can clear in less than two minutes.
📌 Key Takeaways:
- Core Mechanism: The trial relies entirely on using Magnesis to pilot a perforated metal ladle, moving buoyant energy spheres into gated drainage receptacles.
- Common Trap: Players frequently attempt to flick or throw the ancient spheres manually, fighting buoyancy instead of using the metal scoop as an overhead dropper and switch weight.
- Crucial Reward: Draining the reservoir exposes a hidden lower floor containing an underwater chest holding a durable Silver Longsword alongside the monk's Spirit Orb.
Navigating the Goponga Village Ruins to the Shrine Entrance
Reaching Daka Tuss requires crossing the marshlands just west of the Lanayru Tower. The shrine sits amidst the half-sunken huts and decayed wooden bridges of the Goponga Village ruins. The surrounding waters crawl with Electric Keese, Lizalfos armed with shock arrows, and Octoroks capable of sniping players across broad distances.
Approaching from the northern high ground allows you to glide directly over the deepest water channels. If you approach on foot along the mudflats, prepare wooden shields rather than metal ones to mitigate lightning risks during rainy spells. Clear the nearby archers first, as an errant electric arrow while standing in water will interrupt your entry animation and strip Link of his equipped weaponry.
Conquering the First Basin With the Magnesis Metal Scoop
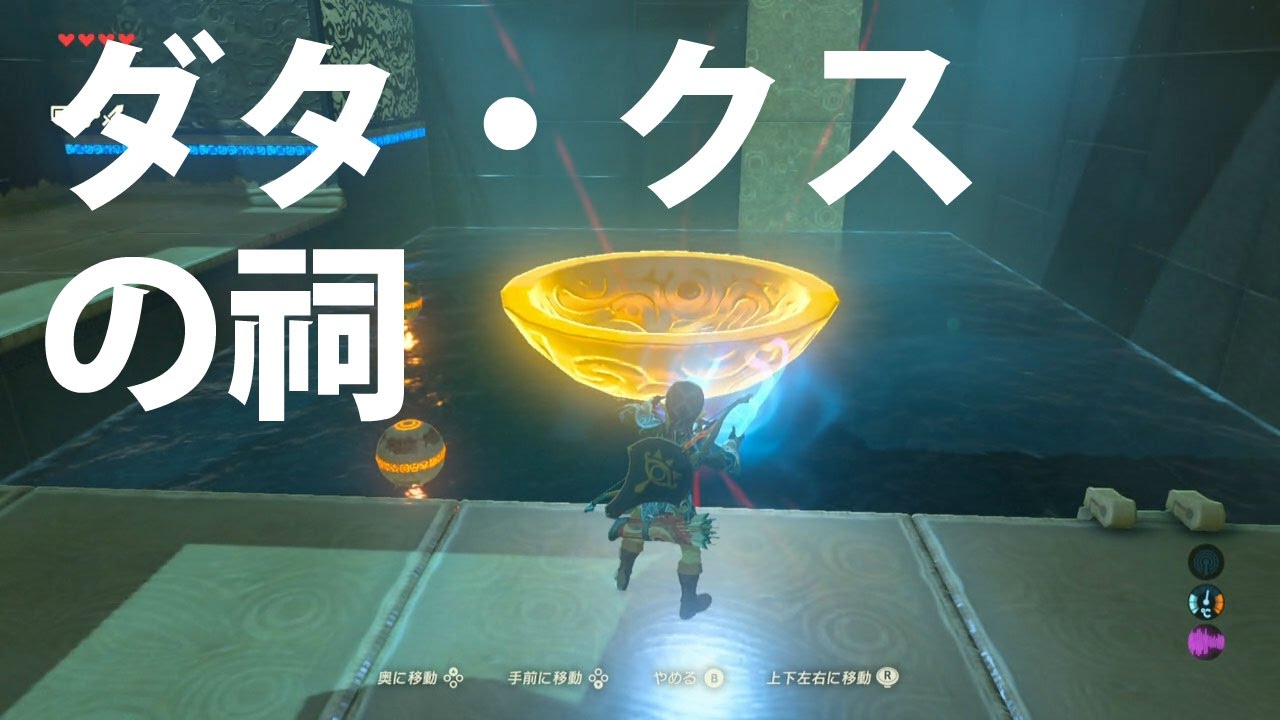
Entering the shrine reveals a massive pool of shallow water holding several glowing orange ancient spheres and a wire-mesh metal scoop settled at the bottom. Across the pool sits a submerged cage holding a circular socket. Many players make the mistake of attempting to nudge the spheres by swimming into them or trying to catch them with Cryonis pillars, which wastes weapon durability and yields zero control.
Activate Magnesis immediately and lock onto the metal bowl resting beneath the surface. Lift the bowl upward and sweep it through the water toward Link. By angling the ladle beneath a floating orange sphere, you can cradle the ball against the mesh.
Slowly raise the scoop into the air. Do not jerk the camera, as rapid movement causes the sphere to slide off the slick metal edge. Walk the suspended scoop over the top of the caged partition, position the bowl directly above the open funnel, and tilt your camera downward to let gravity drop the sphere into the orange orb basin. Once the sphere seats into the pedestal, the nearby portcullis raises immediately.
Cracking the Second Chamber and the Submerged Switch Puzzle
The second room escalates the puzzle by placing an identical metal scoop on Link's side of the room while the receiving cage sits behind a solid iron grate. In this chamber, the funnel is completely enclosed by tall bars, preventing you from simply tossing the sphere from floor level.
Grab the metal scoop from the first chamber or take hold of the fresh one in the second basin. Scoop one of the floating spheres from the pool and elevate it toward the ceiling. Move the suspended ladle directly above the tall cage where the receptor lies. Drop the sphere straight down into the cage opening. The ball will drop directly into the pedestal, turning it from orange to glowing blue.
The door to the monk does not open yet. Instead, solving this stage reveals the water drainage puzzle. At the bottom of the drained pool sits a massive submerged switch plate. Pick up the metal ladle with Magnesis once more, bring it over the floor switch, and firmly press the heavy bowl onto the floor plate. The mechanical lock clicks, and all water drains out of both rooms.
Daka Tuss Shrine Progression and Strategy Matrix
| Puzzle Phase | Primary Mechanism | Common Failure Point | Key Output / Item |
|---|---|---|---|
| Phase 1: Outer Basin | Magnesis ladle scoop & deposit | Excessive camera speed dropping the ball | Opens gate to Chamber Two |
| Phase 2: Barred Receptacle | High-altitude aerial drop over iron grate | Throwing sphere from Link's hands against bars | Activates drain mechanism |
| Phase 3: Reservoir Drainage | Weighted floor plate compression | Standing on the plate manually and getting trapped | Drains basin water completely |
| Phase 4: Chamber Treasure | Backtracking through drained floor tunnel | Running straight to the monk without checking floor | Silver Longsword (16 Base Damage) |
Retrieving the Hidden Underwater Chest Before the Altar
Draining the water opens up the passageway to the monk, but sprinting straight up the ramp forfeits the primary equipment prize of the shrine. Before advancing to the altar, turn back toward the archway connecting the two chambers.
With the water emptied, a low doorway beneath the dividing wall stands open. Walk through this exposed lower tunnel back into the basin of the first room. Resting in the dry sediment sits a metallic treasure chest that was previously submerged beyond reach. Target this chest with Magnesis to pluck it from the ground or simply walk right up and kick it open.
The container holds a Silver Longsword, an exceptional early-to-mid-game two-handed blade. It carries a base attack power of 16 and superior durability compared to standard Soldier or Traveler weapons found throughout the marsh. Once secured, head back through the dry passage, ascend the stone ramp in the second room, and interact with the crystal seal to receive your Spirit Orb from Monk Daka Tuss.
Speedrunner Strategies and Physics Skips
For players running through Hyrule on restricted challenges or speedruns, Daka Tuss offers several time-saving tricks that bypass the intended scoop mechanic entirely. Windbombs (impact launches using remote bombs) allow experienced runners to launch Link straight over the high bars in the second chamber, bypassing the drainage sequence.
If you prefer playing within standard physics without high-level glitches, you can use Stasis on the sphere while it floats in the water. Strike it three times with a one-handed weapon while facing the cage opening, and the kinetic release will vault the orb directly over the partition without ever requiring you to touch the Magnesis scoop.
Frequently Asked Questions (FAQ)
Q1: What should I do if the orange orb falls out of the metal scoop?
A1: The sphere floats indefinitely. You do not need to reload your save. Simply maneuver the metal bowl under the floating sphere again, lift it slowly, and avoid sudden turns with the right analog stick.
Q2: How do I drain the water in the second room if Link cannot reach the switch?
A2: Link does not need to stand on the submerged switch. Use Magnesis to lift the metal scoop, place it squarely on top of the large button at the bottom of the pool, and let the ladle's physical weight hold the plate down.
Q3: Is the Silver Longsword chest missable?
A3: You can retrieve the chest at any point before interacting with the monk. Once you claim the Spirit Orb and complete the trial, you can re-enter the shrine at any time from the Lanayru map to collect missed chests.
Mastering Environmental Physics Across the Lanayru Frontier
Daka Tuss serves as Nintendo's masterclass in teaching players to view Hyrule's mundane tools through a systemic lens. The perforated bowl is not merely a piece of background clutter; it functions as a net, a lever, and a weighted plate all at once. Mastering the nuances of Magnesis and buoyant mass here equips you with the exact physics comprehension needed to tackle the far more taxing Divine Beast Vah Ruta puzzles awaiting you just up the Lanayru river.