The Complete Origami Chair Guide: Easy Instructions, Ratios, and FAQs

Tiny paper furniture is having an unexpected revival among interior modelers, miniaturists, and desk craft enthusiasts. What looks like a casual five-minute paper craft quickly reveals itself as an exercise in structural physics. A flat sheet must support weight, balance across four legs, and keep a clean 90-degree backrest without collapsing under ambient humidity. Mastering the Japanese paper chair (折り紙の椅子の作り方) bridges geometric precision and tactile minimalism, turning standard sheets into functional decorative sculpture.
Social media feeds and craft forums in 2026 show a sharp pivot away from disposable digital aesthetics toward mindful, micro-scale physical objects. Miniature dollhouse builders, architectural modelers, and origami hobbyists are returning to classic fold geometry to build entire living room sets out of single sheets of paper. Achieving crisp lines and self-standing balance demands more than random creasing: it requires understanding paper density, exact proportional grids, and tension lock points.
📌 Quick Summary:
- The Essential Metric: Standard 15 cm x 15 cm square origami paper produces a miniature chair standing roughly 5.5 cm to 6 cm tall, scaled at approximately 1:12 to 1:16.
- The Structural Core: Success relies on crisp mountain and valley folds across a 4x4 or 8x8 pre-creased grid, which transfers vertical loads down the four outer legs.
- Paper Weight Matters: Light 60 to 70 GSM kami paper works for practice, but 80 to 100 GSM tant or textured washi is needed to prevent leg splay over time.
Paper Weight and Geometric Ratios for Miniature Furniture
Paper architecture starts with sheet selection. Most beginners grab standard 15 cm (6 inch) craft paper, fold a chair, and watch the front legs bow out within hours. Lightweight sheets lack the fiber strength to support their own backrests once moisture enters the creases.
Standard craft kami weighs around 60 to 64 GSM. It folds easily, but structural seams buckle under tension. For free-standing origami miniature furniture, Japanese Tant paper (75 to 85 GSM) or medium-weight Kraft paper provides the structural stiffness required to keep perpendicular planes rigid. Tant paper features a subtle textured surface and through-dyed fibers, which stops white edge wear along sharp valley folds.
Scale dictates sheet size. If you are building sets for dollhouse paper crafts, dimension matching is critical:
| Starting Paper Size | Finished Chair Height | Seat Height from Base | Ideal Project Scale |
|---|---|---|---|
| 7.5 cm × 7.5 cm (3" × 3") | 2.8 cm, 3.0 cm | 1.2 cm, 1.4 cm | 1:24 (Half scale / Dioramas) |
| 15 cm × 15 cm (6" × 6") | 5.5 cm, 6.0 cm | 2.5 cm, 2.8 cm | 1:12 (Standard Dollhouse) |
| 20 cm × 20 cm (8" × 8") | 7.5 cm, 8.0 cm | 3.5 cm, 3.8 cm | Tabletop Displays / Place Cards |
| 30 cm × 30 cm (12" × 12") | 11.5 cm, 12.0 cm | 5.2 cm, 5.5 cm | Exhibition / Macro Sculpture |
A standard 15 cm square yields a chair whose seat sits roughly 2.6 cm off the tabletop. If you are creating an origami table and chairs set, calculate the tabletop height first. A balanced dining table needs to sit 1.2 to 1.4 times higher than the chair seat. Using a 20 cm sheet for the table alongside 15 cm sheets for the surrounding chairs creates visually accurate dining proportions.
Step-by-Step Folding Instructions for the Classic 3D Origami Chair
This 3D origami chair tutorial uses a single uncut square of paper. It relies on a classic box-pleat base that forms four independent legs, a reinforced seat platform, and a vertical backrest.
Step 1: Set the Grid Foundation. Begin with the white or uncolored side facing upward. Fold the sheet in half horizontally and vertically, crease hard with a bone folder or fingernail, and unfold. Next, fold the outer edges into the center line to create a cupboard fold. Unfold completely. Repeat the cupboard fold in the opposite direction. You now have an exact 4x4 square grid composed of 16 identical smaller squares.
Step 2: Form the Base Pockets. Turn the paper colored side up. Fold the top and bottom edges inward to meet the horizontal centerline. Turn the paper over. Fold the left and right edges into the vertical center crease. You now hold a thick, compact square containing four internal quadrant flaps.
Step 3: Open the Leg Corners. Lift the top-right flap. Slip your index finger inside the small pocket and press it outward into a squash fold, creating a neat triangular house shape. Repeat this corner squash on the remaining three pockets. These four outward-facing flaps will become the structural legs of your chair.
Step 4: Shape the Leg Posts. Fold the outer edges of each flattened triangle inward toward its center crease. This narrows each leg into a reinforced column. Doing this quadruples the paper thickness along the vertical edges, which keeps the chair upright under downward pressure.
Step 5: Separate the Seat from the Backrest. Fold the bottom half of the model upward along the central horizontal grid line. Take the middle horizontal flap, the panel destined to become the seat surface, and fold it outward at a strict 90-degree angle. As the seat folds down, push the two front legs downward so they sit perpendicular to the floor.
Step 6: Lock the Backrest. Fold down the top triangular flaps behind the backrest to secure the seat plane. Firmly crease the base edges where the backrest meets the seat. Smooth the folds and place the chair on a hard surface to verify that all four legs touch down evenly.
Troubleshooting Common Structural Mistakes
Origami chairs fail for predictable reasons. Most problems happen during early pre-creasing rather than final assembly.
Wobbly legs are the most frequent defect. When one leg sits 2 millimeters higher than the rest, check the initial 4x4 grid. If early grid lines wander off by even half a millimeter, the squash folds become asymmetrical. Uneven squash folds pull the lower corners at different angles. To fix minor wobble without refolding, press the finished chair firmly against a flat table and apply gentle downward pressure while running your thumbnail along the lower leg seams.
Backrest tilt is another common problem. Instead of standing upright, the backrest often falls backward at a wide, loose angle. This happens when the horizontal fold under the seat is too soft. To correct this, reverse the backrest crease into a sharp mountain fold, then press the paper into a tight valley fold right at the seat junction. The opposing paper tension locks the backrest into a clean right angle.
Paper tearing at the central intersection signals over-folding. Thick paper will rip if forced through multiple squash folds at once. If you see stress tears at the junction where the legs meet the seat, switch to a thinner 70 GSM paper or use a bone folder to compress inner layers before flattening the pockets.
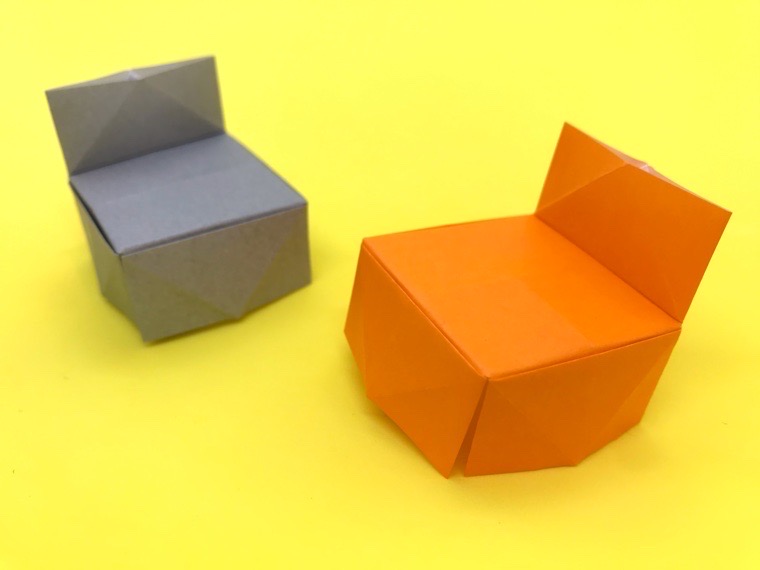
Advanced Variations: Armchairs and Modular Dining Sets
Once you master the four-legged model, moving to an origami armchair tutorial introduces box-pleated side cushions. Armchair variations use an 8x8 foundation grid instead of a 4x4 base. The extra folds create side walls that drop down directly into the seat platform, hiding raw paper edges inside the build.
Building a cohesive dining set requires strict scale discipline. For a balanced setup, pair four chairs folded from 15 cm sheets with a traditional table made from a 21 cm sheet. When folding the table, use a traditional masu box base turned upside down, or fold a four-legged pedestal table. Matching the paper stock across all pieces creates visual unity. A dining set folded from deep walnut-toned Kraft paper or indigo washi mimics real mid-century modern furniture on a miniature scale.
For complex dioramas, wet-folding provides smooth, durable forms. Lightly mist heavy watercolor paper (120 to 140 GSM) with water before making your folds. As the moisture evaporates, the cellulose fibers dry into a rock-solid, rigid shape. This technique works especially well for curved backrests, yielding museum-grade miniature furniture that will not sag over time.
Curating and Displaying Paper Furniture Collections
Miniature paper furniture works best when treated as intentional micro-decor rather than loose craft experiments. Floating shadow boxes make an ideal home for paper chair collections. A 30 cm by 30 cm wooden shadow box with internal grid dividers can showcase a series of iconic chair profiles, folded from different papers, hanging directly on a wall.
For desk displays, set chairs on a slab of honed slate, raw oak, or travertine. The contrast between rough stone and sharp geometric paper elevates simple crafts into conversation pieces. Use micro-adhesive putty under the rear feet to keep the model upright in drafts or air-conditioned rooms.
Protecting the paper from sunlight and moisture is essential. Kami paper fades quickly in direct sunlight. Spray finished pieces with an invisible matte UV fixative from roughly 30 cm away. Two light coats preserve the paper's original color, protect folds against summer humidity, and keep your miniature creations crisp for years.
Frequently Asked Questions (FAQ)
Q1: What is the best paper size for beginners making an origami chair?
A1: Standard 15 cm x 15 cm (6 inch x 6 inch) origami paper is the best choice for beginners. It gives your fingers plenty of room to shape the leg pockets without tearing the paper, and it produces a sturdy model around 6 cm tall.
Q2: Why does my origami chair keep tipping over backwards?
A2: The center of gravity usually shifts backward when the fold between the seat and backrest is too loose. Reinforce the valley fold right at the back of the seat, and angle the back legs outward a fraction of a millimeter to widen the chair's support base.
Q3: Can I make an origami chair without tape or glue?
A3: Yes. Traditional models rely purely on friction and interlocking folds. Glue is only needed when using heavy watercolor paper or when building display models that must survive regular handling.
Q4: How do I fold a matching table for my origami chair?
A4: Use a square sheet that is 1.4 to 1.5 times larger than your chair paper (such as a 21 cm sheet paired with 15 cm chair squares). A modified blintz box fold or an upside-down masu box base will create an ideal dining table that sits just above the chair seats.
Modern Papercraft and the Enduring Appeal of Micro-Design
Folding a miniature chair is ultimately an exercise in structural design. Transforming a single flat square into a self-supporting, load-bearing object demonstrates how geometry creates strength. Whether built for dollhouse interiors, scale architectural mockups, or quiet desk decor, these miniature paper seats show how modest papercraft projects can achieve remarkable architectural elegance.